Install Decidim on Ubuntu 20.04
These instruction should work in any clean installation of Ubuntu 20.04. You may have to adapt some of the step in other cases.
1. Setup a clean server
Use a clean installation, I’m using DigitalOcean for this example, you can get a 50$, 30-day credit to spend in any machine (we use a 1G memory simple droplet here) if you register with this referral:
https://m.do.co/c/b5a36733f0df
Then, create a 1G droplet, choose Ubuntu 20.04:
Once you’ve created the droplet, you will need a domain name, let’s say you bought
my-decidim.org, you’ll need to point an A record in your DNS provider to the droplet public IP.
Then I’ll recommend you to follow the guide from digitalocean in order to create a non-root user and secure your server (this is valid in other providers too):
Follow these instructions using decidim instead of sammy as a user: https://www.digitalocean.com/community/tutorials/initial-server-setup-with-ubuntu-20-04
After that, I’d recommend to add some swap memory in your server (this is not necessary if you create a bigger memory droplet). For low-memory droplets it seems to work better with swap.
To do that follow this tutorial as well:
https://www.digitalocean.com/community/tutorials/how-to-add-swap-space-on-ubuntu-20-04
From now on, I’ll assume you have created a non-root user (with sudo capabilities) named decidim (but use whatever you want) and you are logged into your machine, so you will see a bash prompt similar to this:
ssh decidim@my-decidim.org
Welcome to Ubuntu 20.04 LTS (GNU/Linux 4.15.0-23-generic x86_64)

 * Documentation:  https://help.ubuntu.com
 * Management:     https://landscape.canonical.com
 * Support:        https://ubuntu.com/advantage

  Get cloud support with Ubuntu Advantage Cloud Guest:
    http://www.ubuntu.com/business/services/cloud

51 packages can be updated.
31 updates are security updates.

The programs included with the Ubuntu system are free software;
the exact distribution terms for each program are described in the
individual files in /usr/share/doc/*/copyright.

Ubuntu comes with ABSOLUTELY NO WARRANTY, to the extent permitted by
applicable law.

To run a command as administrator (user "root"), use "sudo <command>".
See "man sudo_root" for details.

decidim@decidim:~$
Great, we have our server up and running. Now we install the required packages before installing decidim:
2. Installing necessary software
First, let’s keep our system up to date:
sudo apt update
sudo apt upgrade
sudo apt autoremove
Now, configure the proper timezone for your server:
sudo dpkg-reconfigure tzdata
Then, install some required packages:
sudo apt install autoconf bison build-essential libssl-dev libyaml-dev libreadline6-dev zlib1g-dev libncurses5-dev libffi-dev libgdbm-dev
Now, let’s install ruby, by using the rbenv method.
These are the commands you need to run if you follow the guide:
git clone https://github.com/rbenv/rbenv.git ~/.rbenv
echo 'export PATH="$HOME/.rbenv/bin:$PATH"' >> ~/.bashrc
echo 'eval "$(rbenv init -)"' >> ~/.bashrc
source ~/.bashrc
Now you should check if you have rbenv correctly installed, running the command type rbenv should give you this answer:
decidim@decidim:~$ type rbenv
rbenv is a function
rbenv ()
{
    local command;
    command="${1:-}";
    if [ "$#" -gt 0 ]; then
        shift;
    fi;
    case "$command" in
        rehash | shell)
            eval "$(rbenv "sh-$command" "$@")"
        ;;
        *)
            command rbenv "$command" "$@"
        ;;
    esac
}
We still need to install ruby-build to simplify the installation of ruby:
git clone https://github.com/rbenv/ruby-build.git ~/.rbenv/plugins/ruby-build
At this point, you should be able to run the command rbenv install -l that will give you all ruby versions available:
decidim@decidim:~$ rbenv install -l
Available versions:
  2.5.8
  2.6.6
  2.7.1
  ...
  rbx-5.0
  truffleruby-20.1.0
  truffleruby+graalvm-20.1.0
We are going to use version 2.6.3, so run these commands:
rbenv install 2.6.3
rbenv global 2.6.3
Now you can verify we have everything in order by running the command ruby -v:
decidim@decidim:~$ ruby -v
ruby 2.6.3p62 (2019-04-16 revision 67580) [x86_64-linux]
If everything is ok, we need to setup Gems, the package manager for Ruby, after that we will be ready to install Decidim.
To setup Gem, execute:
echo "gem: --no-document" > ~/.gemrc
gem install bundler
Again, you can test if everything is ok so far by running the command gem env home
decidim@decidim:~$ gem env home
/home/decidim/.rbenv/versions/2.6.3/lib/ruby/gems/2.6.0
Great, now we have the basic server setup in place, next step is to install Decidim.
3. Installing Decidim
Decidim uses Postgresql as a SQL database, we are going to install it in this machine (more advanced configurations will use a separate server for the database):
sudo apt install -y postgresql libpq-dev
We also need NodeJS as a dependency for the decidim generator, in ubuntu 20.04 it’s fine to install from the repositories (we also install imageMagick and a library needed since version 0.17, used by Decidim):
sudo apt install -y nodejs imagemagick libicu-dev
Now, we use the decidim generator to create our application. Note that you still need the package libpg-dev in order tu run the decidim generator (in case you install postgress in another server).
First, install the gem Decidim (this may take a while):
gem install decidim
Now, run the generator to create our app:
decidim decidim-app
At this point, we have created a new folder in ~/decidim-app with our code. We need to setup the database now.
To do that, first we create the user and password in the database:
sudo -u postgres psql -c "CREATE USER decidim_app WITH SUPERUSER CREATEDB NOCREATEROLE PASSWORD 'Password1'"
Choose a good password like I did ;)
With the user created, it’s time for configure Decidim to use these credentials.
Because we don’t want to directly store this sensitive data in the code itself, we are going to use an additional YAML file that will store all the secrets in one place. If, in the future, we want to create a Git repository with our application, we will exclude this file from the version control.
In order to translate this file to the config system in Decidim, we are going to include the Ruby Gem “figaro” in our app to take care of it.
First, let’s change to the decidim’s folder:
cd ~/decidim-app
Then, let’s edit the Gemfile:
nano Gemfile
We will modify that file to add a “production” section with our extra Gems, we add this line before the first group declaration:
gem "figaro"
And we will create another group section with the production settings that will also install some additional gems needed later on.
Add at the end of the Gemfile:
group :production do
  gem "passenger"
  gem 'delayed_job_active_record'
  gem "daemons"
end
The whole Gemfile should look similar to this:
# frozen_string_literal: true

source "https://rubygems.org"

ruby RUBY_VERSION

gem "decidim", "0.21.0"
# gem "decidim-consultations", "0.21.0"
# gem "decidim-initiatives", "0.21.0"

gem "bootsnap", "~> 1.4"

gem "puma", "~> 4.3"
gem "uglifier", "~> 4.1"

gem "faker", "~> 1.9"

gem "figaro"

group :development, :test do
  gem "byebug", "~> 11.0", platform: :mri
  gem "decidim-dev", "0.21.0"
end

group :development do
  gem "letter_opener_web", "~> 1.3"
  gem "listen", "~> 3.1"
  gem "spring", "~> 2.0"
  gem "spring-watcher-listen", "~> 2.0"
  gem "web-console", "~> 3.5"
end

group :production do
  gem "passenger"
  gem 'delayed_job_active_record'
  gem "daemons"
end
After that we need to update our app to include the extra gems, run the next command (inside the app folder):
bundle install
Now, it’s time to create the configuration file with our custom values. We already have the database credentials (we’ve created the user before) and we need a random string that will be used by Decidim to encrypt cookies and other security stuff.
Let’s generate a random string by executing the command rake secret inside the app folder:
cd ~/decidim-app
rake secret
e2418a1987378e36f18740d25f0360a18099a5caa5d04700ea3336d9fdefadc5362dc885a7a15f671e81f7d77bc98fa4d8abfd048f829a78d7ffd33cd8b4b287
Copy that generated string, and create a new config file:
nano ~/decidim-app/config/application.yml
Paste inside this content:
DATABASE_URL: postgres://decidim_app:Password1@localhost/decidim_prod

SECRET_KEY_BASE: e2418a1987378e36f18740d25f0360a18099a5caa5d04700ea3336d9fdefadc5362dc885a7a15f671e81f7d77bc98fa4d8abfd048f829a78d7ffd33cd8b4b287
Now, just for safety, include this file in the .gitignore file, in case in the future you want to use GIT to manage your app.
Just execute:
echo "/config/application.yml" >> ~/decidim-app/.gitignore
Notes:
- I’ve named my database
decidim_prod, change that value to whatever you want for your decidim app.- Be aware that line with the with the SECRET_KEY_BASE keyword is only ONE line and you MUST put your own generated secret (the one generated with the
rake secretcommand)👉 Going pro (optional):
- Now it’s a good time to initialize your installation as a GIT repository.
- This will allow to keep track of your changes and revert them is something goes wrong.
- This is optional, basically you need to execute:
cd ~/decidim-app git init . git commit -m "Initial commit. Generated with Decidim 0.X https://decidim.org"- After that you should create commits everytime you make a relevant change.
At this point Decidim should be able to start working. We need to initialize and update the database by doing this:
cd ~/decidim-app
bin/rails db:create RAILS_ENV=production
bin/rails assets:precompile db:migrate RAILS_ENV=production
The response to the second command should look something like this (quite long), this command compiles the static assets to prepare our app for production and migrates the database:
decidim@decidim:~/decidim-app$ bin/rails db:create RAILS_ENV=production
Created database 'decidim_prod'
decidim@decidim:~/decidim-app$ bin/rails assets:precompile db:migrate RAILS_ENV=production
Yarn executable was not detected in the system.
Download Yarn at https://yarnpkg.com/en/docs/install
I, [2018-07-16T13:10:56.442340 #32755]  INFO -- : Writing /home/decidim/decidim-app/public/assets/decidim/api/docs-3ca85e11b4f676d392a15494a0eb66962aaf08382c60a09ae3f1d7a6806a59ae.js

...

== 20180713145001 DeviseCreateDecidimUsers: migrating =========================
-- adapter_name()
   -> 0.0000s
-- adapter_name()
   -> 0.0000s
-- adapter_name()
   -> 0.0000s
-- create_table(:decidim_users, {:id=>:integer})
   -> 0.0056s
...
Now we are going to log into the Decidim console Rails app and create our first admin user:
bin/rails console -e production
A new prompt will appear:
Loading production environment (Rails 5.2.0)
irb(main):001:0>
In there, write these 4 lines and press enter (put your email and some secure password, you will use these credentials to login into Decidim super-admin:
email = "my-admin@email"
password = "<a secure password>"
user = Decidim::System::Admin.new(email: email, password: password, password_confirmation: password)
user.save!
Write quit or press CTRL+D to exit the rails console.
If everything went fine, a very basic Decidim installation is ready to be shown to the world. We only are one step away from the glory, that is to configure an http web server to proxy our ruby application and handle the user petitions.
4. Installing Nginx
As a web server we will use Nginx. To install Nginx execute the next commands (the first installs nginx, the others enables the public ports in the firewall, otherwise our webserver won’t be accessible):
sudo apt -y install nginx
sudo ufw allow http
sudo ufw allow https
The last 2 commands are to allow the firewall (if we have it activated) let pass the http/https connection to the server. If you don’t use a firewall, you can skip them.
Nginx is a very fast and efficient web server but it doesn’t handle Ruby applications by itself. We need and intermediary gateway for that, we will use Passenger.
I’ll summarize here all the commands to install Passenger in Ubuntu 20.04 (follow the link to get into details):
sudo apt install -y dirmngr gnupg
sudo apt-key adv --keyserver hkp://keyserver.ubuntu.com:80 --recv-keys 561F9B9CAC40B2F7
sudo apt install -y apt-transport-https ca-certificates
sudo sh -c 'echo deb https://oss-binaries.phusionpassenger.com/apt/passenger focal main > /etc/apt/sources.list.d/passenger.list'
sudo apt update
sudo apt install -y libnginx-mod-http-passenger
Next is to activate passenger, execute this (it’s one line):
if [ ! -f /etc/nginx/modules-enabled/50-mod-http-passenger.conf ]; then sudo ln -s /usr/share/nginx/modules-available/mod-http-passenger.load /etc/nginx/modules-enabled/50-mod-http-passenger.conf ; fi
You can check if the file is created successfully by using ls on that file, it should be something similar to this:
decidim@decidim:~/decidim-app$ sudo ls /etc/nginx/conf.d/mod-http-passenger.conf
/etc/nginx/conf.d/mod-http-passenger.conf
For additional checks, restart nginx:
sudo service nginx restart
If you run the command passenger-config validate-install it should give you an answer like this:
decidim@decidim:~/decidim-app$ sudo /usr/bin/passenger-config validate-install
What would you like to validate?
Use <space> to select.
If the menu doesn't display correctly, press '!'

 ‣ ⬢  Passenger itself
   ⬡  Apache

-------------------------------------------------------------------------

 * Checking whether this Passenger install is in PATH... ✓
 * Checking whether there are no other Passenger installations... ✓

Everything looks good. :-)
If the output complains about having 2 copies of passenger installed, then passenger may be using the wrong copy of it.
Let’s ensure everything is ok by editing the file /etc/nginx/conf.d/mod-http-passenger.conf:
sudo nano /etc/nginx/conf.d/mod-http-passenger.conf
And be sure that the line that contains passenger_ruby points to our .rbenv ruby folder, the whole file should look like this:
### Begin automatically installed Phusion Passenger config snippet ###
passenger_root /usr/lib/ruby/vendor_ruby/phusion_passenger/locations.ini;
passenger_ruby /home/decidim/.rbenv/shims/ruby;
### End automatically installed Phusion Passenger config snippet ###
Once Nginx & Passenger are installed, we’ll configure nginx to point http(s) request to our copy of Decidim. To do that, we need to create an Nginx configuration file and setup a new virtual host with our domain (ie: my-decidim.org):
Create/edit the new Nginx config file:
sudo nano /etc/nginx/sites-enabled/decidim.conf
Paste this inside (replace my-decidim.org with your own domain):
server {
    listen 80;
    listen [::]:80 ipv6only=on;

    server_name my-decidim.org;
    client_max_body_size 32M;

    passenger_enabled on;
    passenger_ruby /home/decidim/.rbenv/shims/ruby;

    rails_env    production;
    root         /home/decidim/decidim-app/public;
}
Restart Nginx now:
sudo service nginx restart
Done! Decidim should be working now on our server, if you point your browser to your domain (ie: my-decidim.org) it will redirect you to the system admin interface (which is the web interface that will allow to create your first organization):
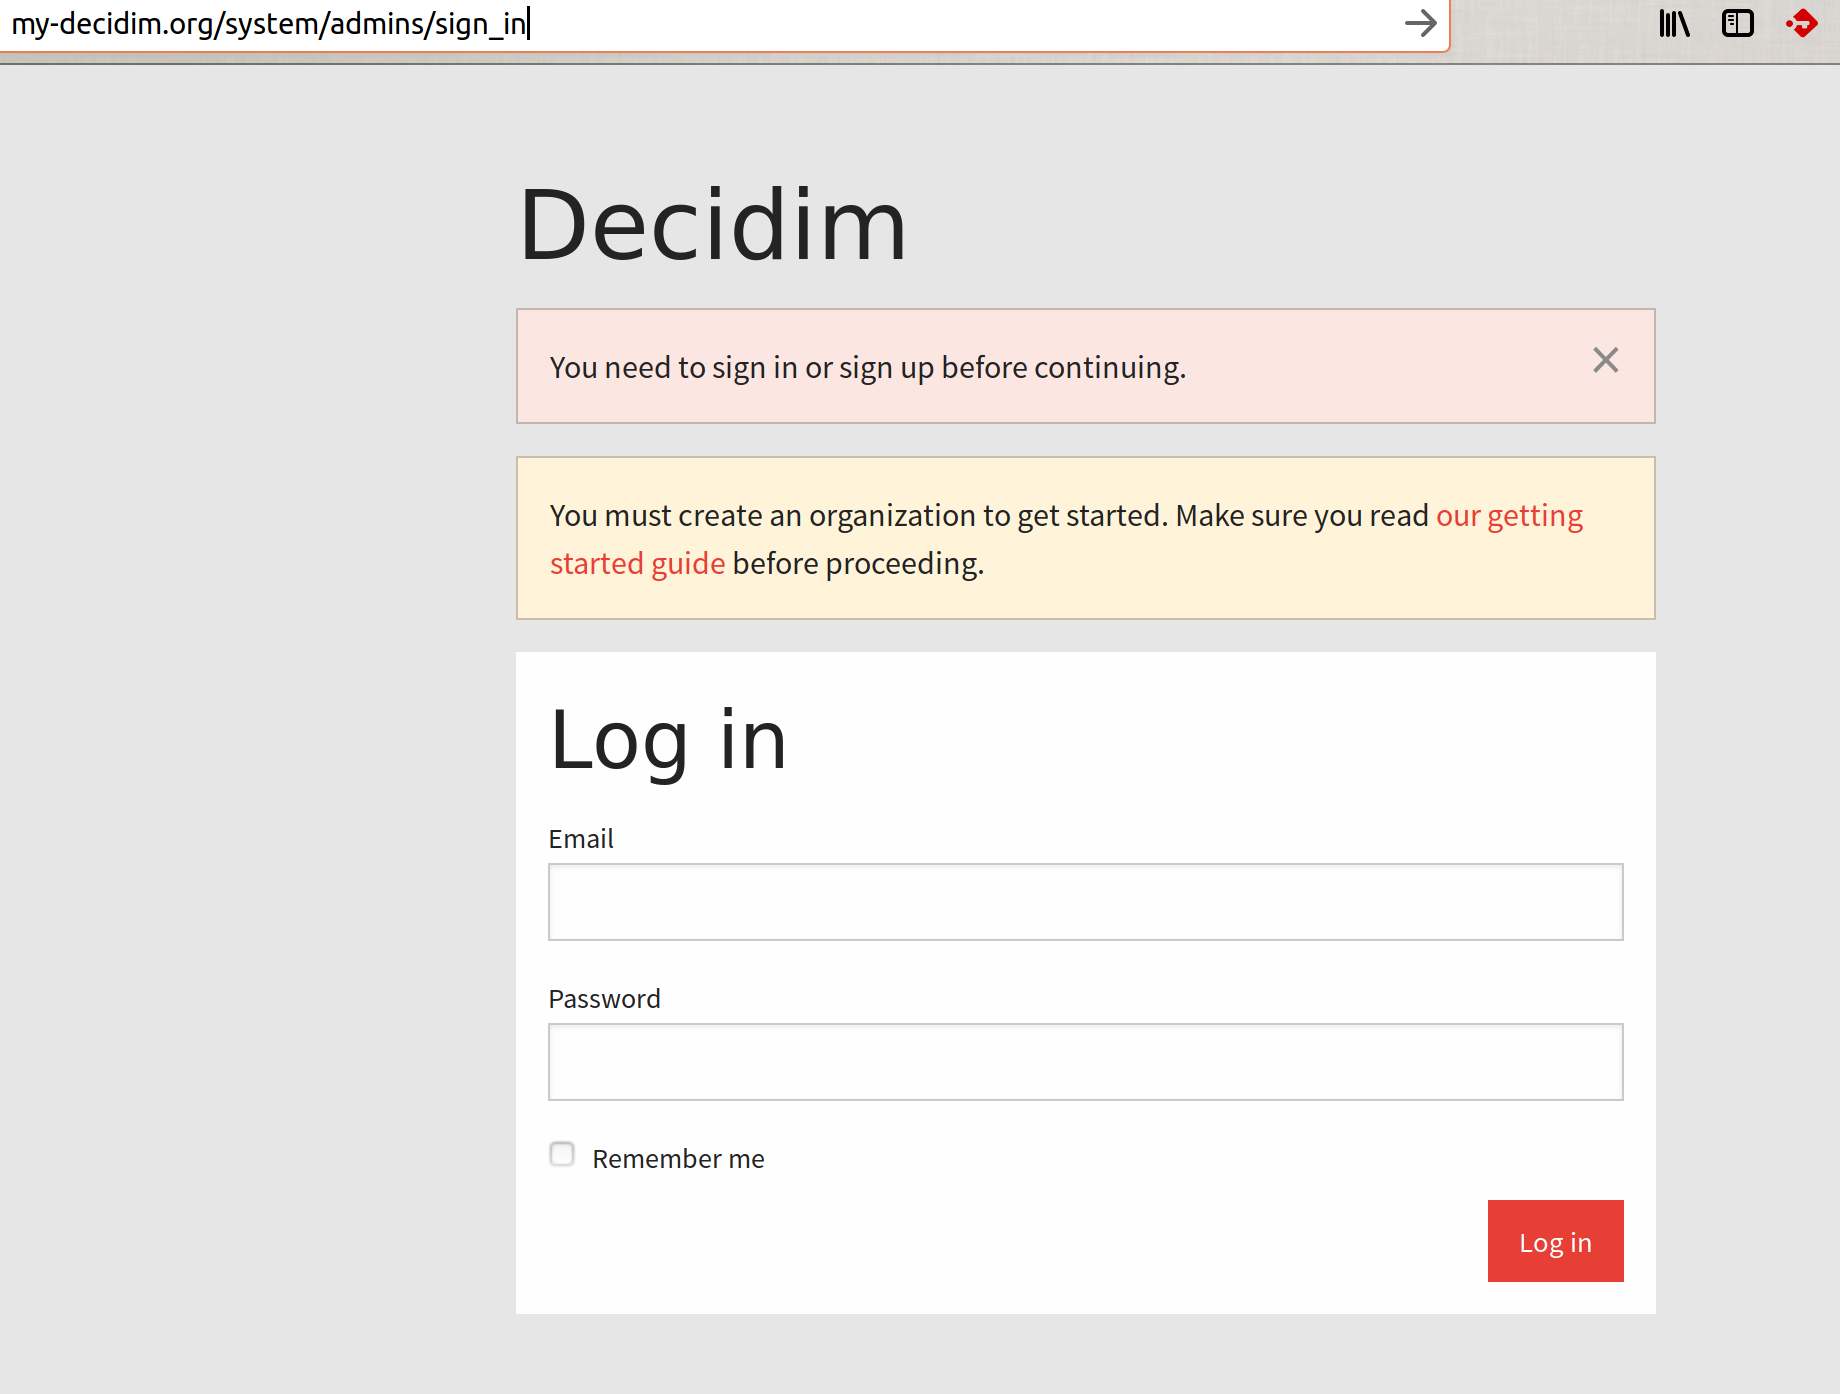
You can login into this administrator using the credentials you created when logged into the Rails console (my-admin@email).
But before to do that, there are somethings that should be configured, because, right now, our system is not capable yet of sending emails (which is a basic thing).
Continue this guide by setting up a basic configuration.