Basic configuration of Decidim
In this document, we’ll finish the configuration of our installation of Decidim in order to make it capable of the most basic things, like sending emails. This configuration is independent of the operating system, that’s why it’s in a different file.
I’ll assume here that you have a running copy of Decidim with empty content, no users or organizations created yet (a part from the system user admin created in the previous tutorial).
Email configuration
UPDATE In recent version of Decidim you can configure the SMTP server through the
/system/administrator, and use a different one for every tenant. If you follow the next steps, this will be used as a fallback.
The most important thing to configure is the capability for sending emails, otherwise users won’t be able to register.
We’ll configure here a Gmail account, which is suitable for small organizations in order to get started. Configure any other SMTP provider is analogous.
NOTE: Gmail has a limit of 500 recipients per day (10000 per day if you are using Gsuite) and, therefore, is not recommended for medium/large production sites.
Another drawback of using Gmail is that the “From” field of the email is going to be rewritten no matter what we configure in Decidim. This is going to affect how the end users sees the sender.
You can use external email providers like Amazon SES or similar.
First, we need to configure our Gmail account in order to allow external SMTP activation. Gmail accounts may have SMTP sending disable by default if you have disabled the option “Enable less secure applications”. In that case we need to create an application password for Decidim.
Option 1, enable “less secure applications”.
Go to this link (logged into your Gmail account), and activate the checkbox “Allow less secure apps”:
https://myaccount.google.com/lesssecureapps
Official instructions from Google are here: https://support.google.com/accounts/answer/6010255?hl=en
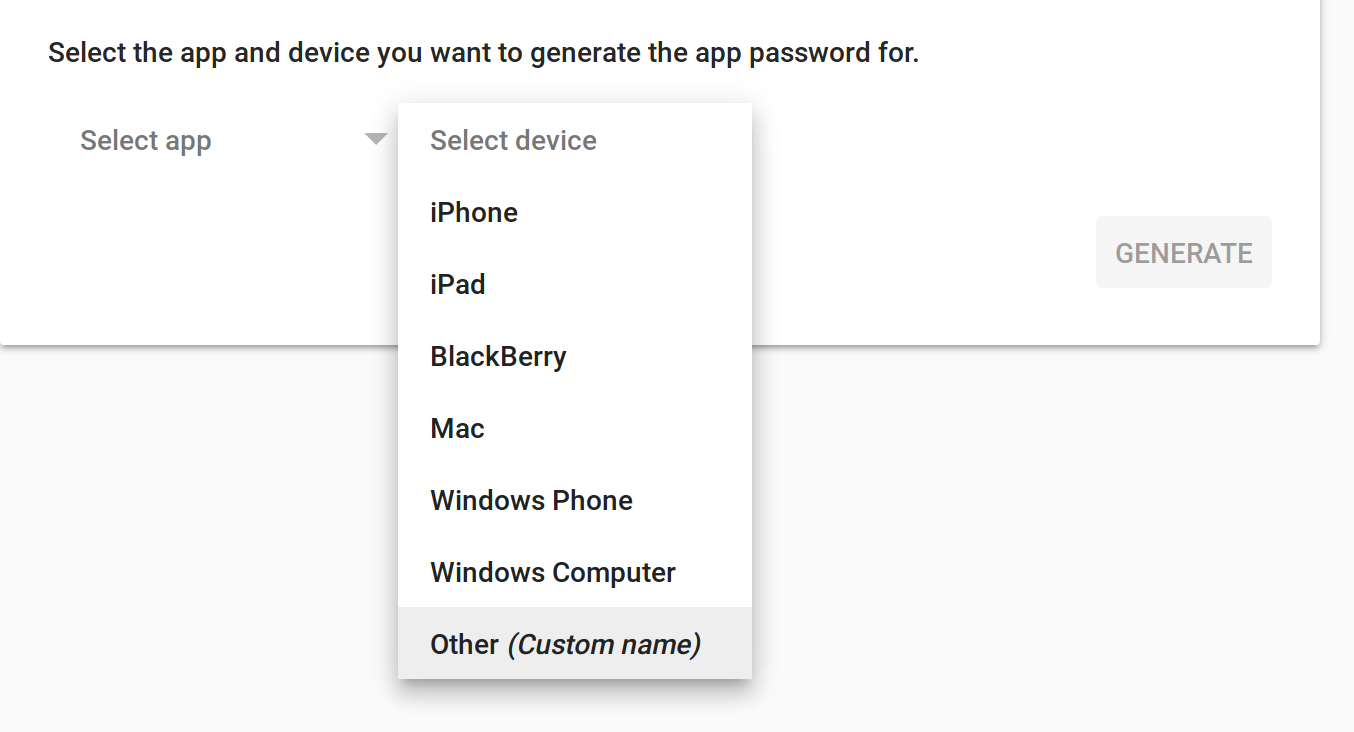
Option 2, create an application specific password. If you have 2-factor authentication on your Gmail account you must choose this option.
- Go to https://security.google.com/settings/security/apppasswords and login using your Gmail account.
- Create a new application password by selecting the option “Other” in the section “Device”:
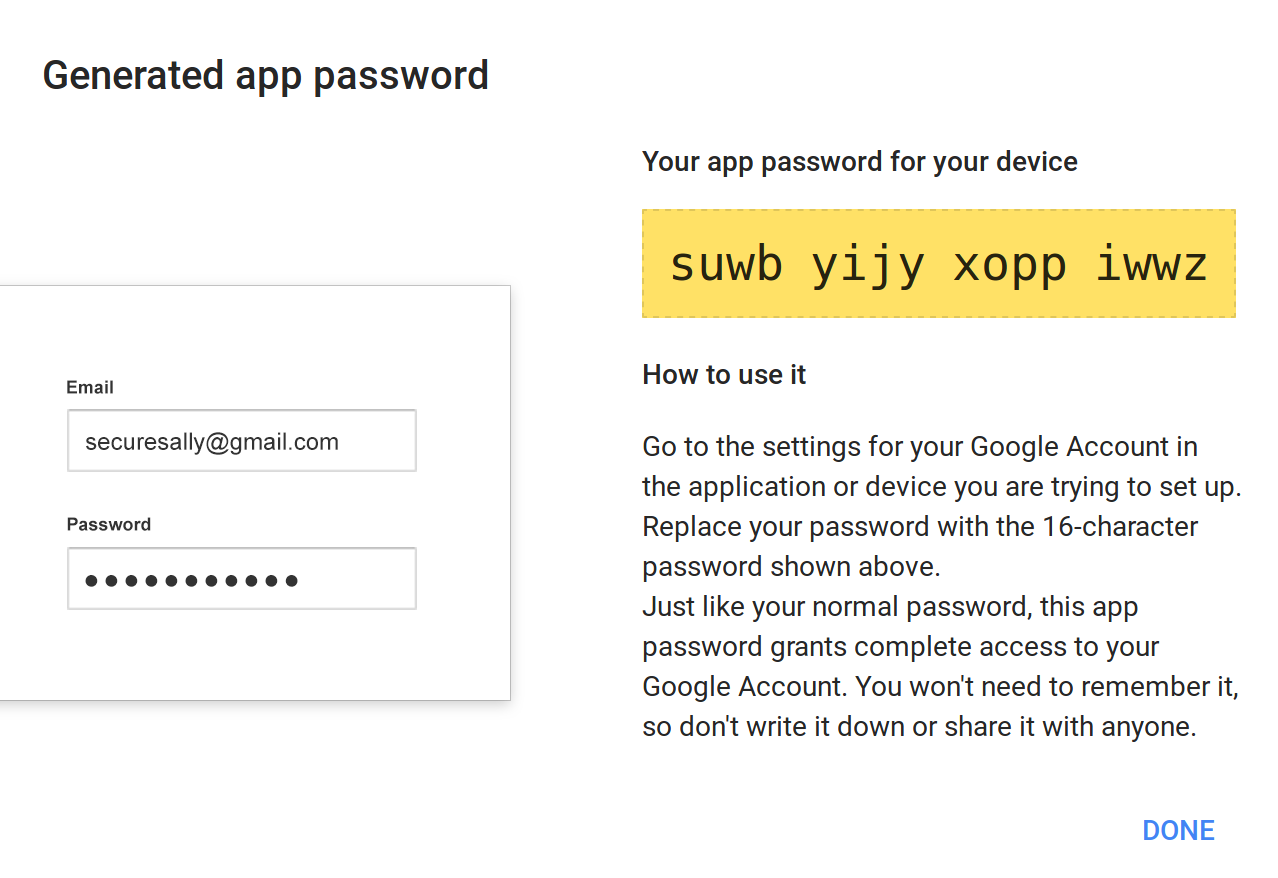
- A new window will appear with your password, copy it because you won’t be able to read that password anymore once you close that window (you can always generate a news app password though).
Official documentation from Google is here: https://support.google.com/mail/answer/185833?hl=en
We can now proceed to configure Decidim to use our credentials.
Let’s edit our application.yml file and add some constants in that file:
nano ~/decidim-app/config/application.yml
Add these lines at the end, by using your own Gmail (or Gsuite) account and using your Gmail password if choosed the Option 1 or the generated password in case of Option 2
SMTP_USERNAME: my-decidim@gmail.com
SMTP_PASSWORD: suwbyijyxoppiwwz
SMTP_ADDRESS: smtp.gmail.com
SMTP_DOMAIN: gmail.com
If you are using Gsuite, replace gmail.com with your own domain (except in the line SMTP_ADDRESS).
If you are using some other SMTP configuration you have more parameters to tweak under the file
config/secrets.ymlCheck the section
productionon that file (for example, you may want to change the default port from587to465,25, etc)
Now, we need to add a processor to Ruby on Rails that will actually send the emails. There’s several options here, as usually we are going to use the simplest one.
In our Gemfile (if you followed the previous guide), we added the Gem delayed_job_active_record, ensure that your Gemfile has it along with the daemons gem:
group :production do
  gem "passenger"
  gem 'delayed_job_active_record'
  gem "daemons"
end
We need to setup the delayed_job gem, run these commands:
cd ~/decidim-app
bundle install
bin/rails generate delayed_job:active_record
bin/rake db:migrate
At this point, our system should be able to send emails, however, there’s and additional file that should be configured to specify our “FROM” sender field. This is specially important if you don’t use Gmail, because Gmail always overwrites that field to match the sender account.
So, edit the file config/initializers/decidim.rb and change the values My Application Name and change-me@domain.org values to match your own ones:
cd ~/decidim-app
nano config/initializers/decidim.rb
Search for these lines and change them to match your own values:
...
Decidim.configure do |config|
  config.application_name = "My Application Name"
  config.mailer_sender = "change-me@domain.org"
...
Delayed job is an independent process that handles emails asynchronously, it needs to be up and running, use this command to start the process:
cd ~/decidim-app
RAILS_ENV=production bin/delayed_job restart
If you face problems of non-sent emails, please check if delayed_job is running:
RAILS_ENV=production bin/delayed_job status
You should now ensure that delayed_job is started on system reboot. To ensure that we can create a custom script in the system crontab:
Create a new file in your config folder:
cd ~/decidim-app
nano config/delayed_job_cron.sh
Copy this content to that file, changing the APP_PATH to match your decidim app if required:
#!/bin/bash

export PATH="$HOME/.rbenv/bin:$PATH"
eval "$(rbenv init -)"
APP_PATH="$HOME/decidim-app"

if ! [ -s $APP_PATH/tmp/pids/delayed_job.pid ]; then
  RAILS_ENV=production $APP_PATH/bin/delayed_job start
fi
Exit (pressing CTRL-X and saving), then give the file execution permissions:
chmod +x config/delayed_job_cron.sh
Now create a crontab entry with the command:
crontab -e
Add the next line to it (again, change the path if you have personalized the application route):
*/5 * * * * /home/decidim/decidim-app/config/delayed_job_cron.sh
👉 A more robust solution is to use
sidekiq, this involves the use of the additional simple storage database Redis. The process is described in the configuration of Decidim using AWS, but Redis should be installed manually if using the DigitalOcean guide.
Now, if you are using IPv6 in your system, you may encounter problems sending emails via external smtp servers (at least with Gmail). If you don’t need IPv6 (if you don’t know, chances are that you don’t), I’d recommend to disable it. To do that edit the file /etc/sysctl.conf:
sudo nano /etc/sysctl.conf
And add at the end of the file these lines:
#disable ipv6
net.ipv6.conf.all.disable_ipv6 = 1
net.ipv6.conf.default.disable_ipv6 = 1
net.ipv6.conf.lo.disable_ipv6 = 1
Apply the changes to the system:
sudo sysctl -p
Finally, reload passenger with this command:
sudo passenger-config restart-app ~/decidim-app
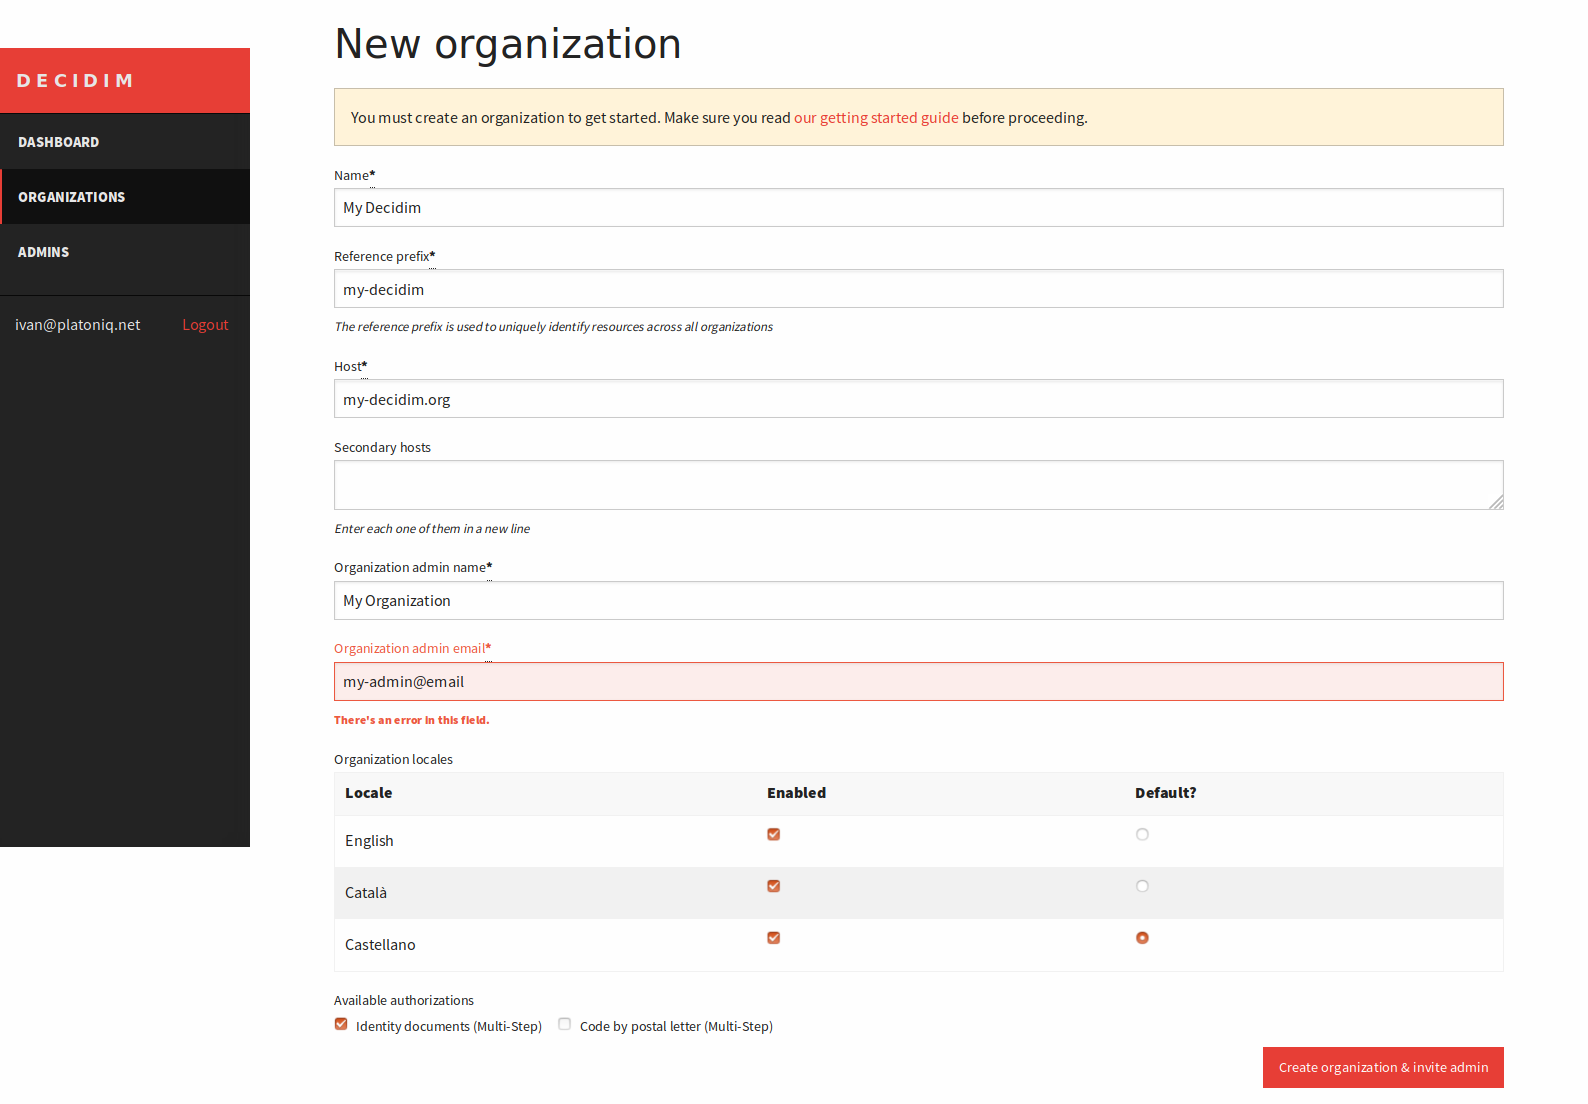
Our system should be ready now, we can go to our Decidim URL/system login with our system manager user created in the previous tutorial and create our first organization. You’ll see a window similar to this:
Once created you can start using Decidim, next steps are optional (but recommended).
Debugging email problems
If you’re your Decidim is not sending mails you need to find out the cause. Decidim has a log file, in our case it’s placed in the folder log in our installation folder.
You can follow “live” everything that happens using the tail command:
tail ~/decidim-app/log/production.log -f
(Press CTRL-C to exit)
But we are interested in finding errors while sending emails, you can do it with grep:
grep ERROR ~/decidim-app/log/production.log -A3 -B3
If that gives you some results you may want to post an issue with the info.
For example, if you see something like this:
----==_mimepart_5b4f1d00c0e07_4b232aceae7075f418469--

E, [2018-07-18T12:57:34.801540 #19235] ERROR -- : [ActiveJob] [ActionMailer::DeliveryJob] [a0572a5f-6ed3-45dd-bc24-3568bc6f665b] Error performing ActionMailer::DeliveryJob (Job ID: a0572a5f-6ed3-45dd-bc24-3568bc6f665b) from Async(mailers) in 30203.2ms: Net::OpenTimeout (execution expired):
/home/decidim/.rbenv/versions/2.5.1/lib/ruby/2.5.0/net/smtp.rb:539:in `initialize'
/home/decidim/.rbenv/versions/2.5.1/lib/ruby/2.5.0/net/smtp.rb:539:in `open'
Then, you are probably suffering the IPv6 problem commented before.
Enabling SSL (with Let’s encrypt)
Although this is not mandatory in order to have Decidim working, in a practical way it is: SSL will give your users trust and it’s free nowadays.
SSL ensures that you offer a secure site to your users (URL will start with https://) and the browsers won’t annoy you with that “insecure page” message.
You can follow this guide from DigitalOcean to configure Nginx with Let’s Encrypt, here are the steps summarized:
We are going to use the official Certbot from the Let’s Encrypt project.
First, we install the latests version with these commands:
sudo add-apt-repository -y ppa:certbot/certbot
sudo apt install -y python-certbot-nginx
The original guide has now some step to check our domain name and our firewall configuration, if you’ve followed the previous tutorial we have this already covered.
So, let’s run the certbot script (change my-decidim.org with your own full URL):
sudo certbot --nginx -d my-decidim.org
You will have to answer 3 questions (write your email, accept the terms and choose if you want to be included in their newsletter). Once the script has collected your certificate, it will ask you if you want to redirect all http to https, I recommend to choose yes here so no further configuration will be needed in our Decidim install.
The output of the full command should be like this:
decidim@decidim:~$ sudo certbot --nginx -d my-decidim.org
Saving debug log to /var/log/letsencrypt/letsencrypt.log
Plugins selected: Authenticator nginx, Installer nginx
Enter email address (used for urgent renewal and security notices) (Enter 'c' to
cancel): ivan@platoniq.net

-------------------------------------------------------------------------------
Please read the Terms of Service at
https://letsencrypt.org/documents/LE-SA-v1.2-November-15-2017.pdf. You must
agree in order to register with the ACME server at
https://acme-v01.api.letsencrypt.org/directory
-------------------------------------------------------------------------------
(A)gree/(C)ancel: A

-------------------------------------------------------------------------------
Would you be willing to share your email address with the Electronic Frontier
Foundation, a founding partner of the Let's Encrypt project and the non-profit
organization that develops Certbot? We'd like to send you email about our work
encrypting the web, EFF news, campaigns, and ways to support digital freedom.
-------------------------------------------------------------------------------
(Y)es/(N)o: Y
Obtaining a new certificate
Performing the following challenges:
http-01 challenge for my-decidim.org
Waiting for verification...
Cleaning up challenges
Deploying Certificate to VirtualHost /etc/nginx/sites-enabled/decidim.conf

Please choose whether or not to redirect HTTP traffic to HTTPS, removing HTTP access.
-------------------------------------------------------------------------------
1: No redirect - Make no further changes to the webserver configuration.
2: Redirect - Make all requests redirect to secure HTTPS access. Choose this for
new sites, or if you're confident your site works on HTTPS. You can undo this
change by editing your web server's configuration.
-------------------------------------------------------------------------------
Select the appropriate number [1-2] then [enter] (press 'c' to cancel): 2
Redirecting all traffic on port 80 to ssl in /etc/nginx/sites-enabled/decidim.conf

-------------------------------------------------------------------------------
Congratulations! You have successfully enabled https://my-decidim.org

You should test your configuration at:
https://www.ssllabs.com/ssltest/analyze.html?d=my-decidim.org
-------------------------------------------------------------------------------

IMPORTANT NOTES:
 - Congratulations! Your certificate and chain have been saved at:
   /etc/letsencrypt/live/my-decidim.org/fullchain.pem
   Your key file has been saved at:
   /etc/letsencrypt/live/my-decidim.org/privkey.pem
   Your cert will expire on 2018-10-17. To obtain a new or tweaked
   version of this certificate in the future, simply run certbot again
   with the "certonly" option. To non-interactively renew *all* of
   your certificates, run "certbot renew"
 - Your account credentials have been saved in your Certbot
   configuration directory at /etc/letsencrypt. You should make a
   secure backup of this folder now. This configuration directory will
   also contain certificates and private keys obtained by Certbot so
   making regular backups of this folder is ideal.
 - If you like Certbot, please consider supporting our work by:

   Donating to ISRG / Let's Encrypt:   https://letsencrypt.org/donate
   Donating to EFF:                    https://eff.org/donate-le
The script also creates an entry in the crontab system to renew automatically the certificate every 3 months. Read the original guide for more details.
What now? Nothing! That’s it! You can point your browser to your URL and will see how your Decidim is served securely.
Setting up Oauth authentication
By configuring OAuth, you’ll be able to log into your installation of Decidim by using some well known providers, like Facebook, Google or Twitter.
I highly recommend to configure SSL before get into this step. You’ll need to tell the providers about your full URL and that includes the https:// part.
You can just follow the original documentation from the core team of Decidim, but as we are using the gem figaro we’ll modify the file config/application.yml instead of config/secrets.yml.
These are the original instructions tweaked to match our configuration:
- Navigate to Facebook Developers Page
- Follow the “Add a New App” link.
- Click the “Website” option.
- Fill in your application name and click “Create New Facebook App ID” button.
- Fill in the contact email info and category.
- Validate the captcha.
- Ignore the source code and fill in the URL field with
https://YOUR_DECIDIM_HOST/users/auth/facebook/callback - Navigate to the application dashboard and copy the APP_ID and APP_SECRET
- Navigate to Twitter Developers Page
- You need to apply for a Developer’s account, will be guided during the process
- Follow the “My apps” link.
- Click the “Create New App” button.
- Fill in the
Name,Descriptionfields. - Fill in the
Websitefield with YOUR_DECIDIM_HOST value and theCallback URLfield withhttps://YOUR_DECIDIM_HOST/users/auth/twitter/callback. If you are working on a development app you need to usehttp://127.0.0.1:3000/instead ofhttp://localhost:3000/. - Check the ‘Developer Agreement’ checkbox and click the ‘Create your Twitter application’ button.
- Navigate to the “Keys and Access Tokens” tab and copy the API_KEY and API_SECRET.
- (Optional) Navigate to the “Permissions” tab and check the “Request email addresses from users” checkbox.
- Navigate to Google Developers Page
- Follow the ‘Create project’ link.
- Fill in the name of your app.
- Navigate to the project dashboard and click on “Enable API”
- Click on
Google+ APIand then “Enable” - Navigate to the project credentials page and click on
OAuth consent screen. - Fill in the
Product namefield - Click on
Credentialstab and click on “Create credentials” button. SelectOAuth client ID. - Select
Web applications. Fill in theAuthorized Javascript originswith your url. Then fill in theAuthorized redirect URIswith your url and append the path/users/auth/google_oauth2/callback. - Copy the CLIENT_ID AND CLIENT_SECRET
Common steps
Once you’ve created your desired applications in the providers you want. You need to activate the variable enabled in the file config/secrets.yml for each configured service.
For instance, if we want the Facebook login, we need to edit the secion “default/ommiauth/facebook”:
nano ~/decidim-app/config/secrets.yml
We will make sure it looks like this:
...
default: &default
  omniauth:
    facebook:
      # It must be a boolean. Remember ENV variables doesn't support booleans.
      enabled: true
      app_id: <%= ENV["OMNIAUTH_FACEBOOK_APP_ID"] %>
      app_secret: <%= ENV["OMNIAUTH_FACEBOOK_APP_SECRET"] %>
...
Repeat the process for every service you want.
After that we need to add the env vars to our config/application.yml file.
nano ~/decidim-app/config/application.yml
Add the lines you need according to your services:
# if you've enabled facebook:
OMNIAUTH_FACEBOOK_APP_ID: <your-facebook-app-id>
OMNIAUTH_FACEBOOK_APP_SECRET: <your-facebook-app-secret>
# if twitter:
OMNIAUTH_TWITTER_API_KEY: <your-twitter-api-key>
OMNIAUTH_TWITTER_API_SECRET: <your-twitter-api-secret>
# if google:
OMNIAUTH_GOOGLE_CLIENT_ID: <your-google-client-id>
OMNIAUTH_GOOGLE_CLIENT_SECRET: <your-google-client-secret>
Restart passenger and you’re done:
sudo passenger-config restart-app ~/decidim-app
Note if you are using ENV vars directly - as we do in AWS Elastic Beanstalk - You don’t need to edit the file
config/application.ymljust create the appropiate ENV var in your instances.In Elastic Beanstalk the commands will be:
eb setenv OMNIAUTH_FACEBOOK_APP_ID=*****
eb setenv OMNIAUTH_FACEBOOK_APP_SECRET=*****
eb deploy
Geolocation configuration
Configuring geolocation allows to specify real addresses and display the locations of meetings in maps.
The easiest way to setup geolocation is to create an account hi Here Maps. Open next URL in your browser and register a developer account there:
https://developer.here.com/?create=Evaluation&keepState=true&step=account
Then obtain your API ID and Code from there, you should look for a place like this:

Now edit your config/application.yml again (or send the ENV vars in case you are not using the file application.yml):
nano ~/decidim-app/config/application.yml
And place these new extra lines at the bottom of the file:
GEOCODER_LOOKUP_API_KEY: <your-App-Code>
Also, ensure that the file ~/decidim-app/config/secrets.yml has the appropiate variables configured, it should look like this:
...
  geocoder:
    here_api_key: <%= ENV["GEOCODER_LOOKUP_API_KEY"] %>
...
Either you use ENV variables or the config/application.yml file, you need to uncomment the following lines from the file config/initializers/decidim.rb:
  # config.geocoder = {
  #  static_map_url: "https://image.maps.ls.hereapi.com/mia/1.6/mapview",
  #  here_api_key: Rails.application.secrets.geocoder[:here_api_key]
  # }
leave it like:
  config.geocoder = {
    static_map_url: "https://image.maps.ls.hereapi.com/mia/1.6/mapview",
    here_api_key: Rails.application.secrets.geocoder[:here_api_key]
  }
Create a commit and push to remote if you are using GIT.
Restart passenger (or deploy) and you’re ready to use maps geolocation in Decidim:
sudo passenger-config restart-app ~/decidim-app
CRON JOBS
It is nice to have stats in your website, such as number of users, numbers of proposals, etc. Decidim has a system to generate various metrics to know the status of the platform at any specific day.
These stats, however, should be generated in a specific job that must be run periodically in your server (once a day).
Similarly, there are other processes that need background processing as well.
In order to ensure our Decidim installation is fully working, we could use several options available to run cronjobs. We will use the gem Whenever to take care of this (but there are several other methods available).
After that you just need to edit the Gemfile, add this content:
nano ~/decidim-app/Gemfile
Add the line with whenever, such as:
...
gem "figaro"
gem "whenever", require: false

group :development, :test do
...
Then run bundle update in the app’s folder:
cd ~/decidim-app
bundle update
Now, we need to create the cron schedule file that the gem will use to know when to run the background task. Just create a new file in config/schedule.rb with this content:
nano ~/decidim-app/config/schedule.rb
env :PATH, ENV['PATH']

every :sunday, at: '5:00 am' do
  rake "decidim:delete_data_portability_files"
end

every :sunday, at: '4:00 am' do
  rake "decidim:open_data:export"
end

every 1.day, at: '3:00 am' do
  rake "decidim:metrics:all"
end
Check if whenever is reading correctly everything correctly:
cd ~/decidim-app
bundle exec whenever
It should show something like this:
PATH=/home/decidim/.rbenv/versions/2.6.3/lib/ruby/gems/2.6.0/bin:/home/decidim/.rbenv/versions/2.6.3/bin:/home/decidim/.rbenv/libexec:/home/decidim/.rbenv/plugins/ruby-build/bin:/home/decidim/.rbenv/plugins/rbenv-vars/bin:/home/decidim/.rbenv/shims:/home/decidim/.rbenv/bin:/home/decidim/.local/bin:/home/decidim/bin:/usr/local/sbin:/usr/local/bin:/usr/sbin:/usr/bin:/sbin:/bin:/usr/games:/usr/local/games:/snap/bin

0 5 * * 0 /bin/bash -l -c 'cd /home/decidim/decidim-app && RAILS_ENV=production bundle exec rake decidim:delete_data_portability_files --silent'

0 4 * * 0 /bin/bash -l -c 'cd /home/decidim/decidim-app && RAILS_ENV=production bundle exec rake decidim:open_data:export --silent'

0 3 * * * /bin/bash -l -c 'cd /home/decidim/decidim-app && RAILS_ENV=production bundle exec rake decidim:metrics:all --silent'

## [message] Above is your schedule file converted to cron syntax; your crontab file was not updated.
## [message] Run `whenever --help' for more options.
Now, it is just a matter of adding it to the server’s crontab, just execute:
bundle exec whenever --update-crontab
It is recommended to restart the server as well because we’ve modified the Gemfile:
sudo passenger-config restart-app ~/decidim-app
That will be all! Happy metrics!